Showing posts with label free pattern. Show all posts

Saturday, July 18, 2015

Zinnia Square


MATERIALS
I - 9 (5.5 mm) crochet hook
tapestry needle

YARN
Four colors of worsted weight yarn

For the green sample I used:  Murphy’s Mart Wintuk in Pink, Red Heart Super Saver in a dark blue, and an unknown worsted weight in green
For the white sample I used:  Red Heart Super Saver in Soft Yellow, an unknown worsted weight in turquoise, Red Heart Soft in a dark pink, and Caron Simply Soft in White.
For the blue sample I used:  Lily Sugar ’N Cream in Hot Orange, Soft Violet, and Hot Blue and Lion Brand Lion Cotton in Fuchsia 
For the Christmas sample I used:  unknown worsted weight cotton

STITCHES USED (US TERMINOLOGY)
ch:  chain
sc:  single crochet
dc:  double crochet
tr:  treble crochet

DIRECTIONS

With C1, ch 3.  Slip stitch to first ch to make loop.

ROUND 1:  Ch 3 (counts as first dc), 11 dc around.  Sl st to first ch of ch 3. Fasten off C1.  (12 dc)

ROUND 2:  Join C2 with sl st to any dc.  Ch 3 (counts as first dc), dc in same stitch, 2 dc in each dc around.  Sl st to first ch of ch 3.  (24 dc)

ROUND 3: Ch 3 (counts as first dc), dc in same stitch.  *Dc, 2 dc* around.  Sl st to first ch of ch 3.  Fasten off C2.  (36 dc)

ROUND 4:  Join C3 with sl st to any dc.  Ch 3, 3 dc, ch 2, 3 dc, skip 2 stitches.  *3 dc, ch 2, 3 dc, skip 2 stitches* around.  Sl st to bottom of first ch 3 sp.  Fasten off C3. (12 points)

ROUND 5:  Join C4 with sl st to top ch 2 of “point.”  Ch 4, 2 tbl, ch 3, 3 tbl in space.  ~*ch 3, sc in top of “point,” ch 3* 2 times.  [3 tbl, ch 3, 3 tbl]~ in next space.  Repeat from ~ around.  Join with sl st in top ch of first ch 4.  (4 corners, 8 sc.)


ROUND 6:  Sc in sp.  Sc.  *2 sc, ch 2, 2 sc* in corner.  3 sc.  [2 sc in chain space.  sc in sc.] Repeat between [ ] once. 3 sc.  *2 sc, ch 2, 2 sc* for corner.  Repeat around.  Fasten off C4.


Be sure to add your completed square to Ravelry!

Happy crocheting!  x o 


Friday, March 12, 2010

Wagon Wheel Granny Square

I saw Attic24’s post on stashbusting where she talked about Granny Square Favorites by Jean Leinhauser and Rita Weiss. In it, there’s a crazy granny square Hostess Apron, but Lucy (Attic24) liked the square, the Wagon Wheel Square they used and crocheted up her own. This is hers:


I loved it so much I decided to crochet up my own to add to my grandma's afghan.  As I went, I wrote a pattern and got it tested and have decided to post it here for your crocheting goodness.  Now, I can't completely claim it as my own since it's from a book, and I used hers as a guide, but please don't claim the pattern as yours, or distribute it without crediting me.  This is how I did it, and I felt it'd be nice to share, so please don't go abusing the offer.  Please don't repost on your site, and if you do make it, please let me know, either via email or on Ravelry.  Enjoy!


WAGON WHEEL GRANNY SQUARE


MATERIALS
I used an I – 9 crochet hook; use whatever you need to get 6 inches.
Tapestry needle.
Stitch markers (optional; you’ll be switching yarn every round, so it’s not that necessary, but if you choose to do a single color or different color scheme, it may help.)

YARN
Any worsted weight yarn will do in three colors. I used:
C1: Lion Brand’s Pound of Love in Lavender
C2: Caron Simply Soft in White
C3: Caron Simply Soft in Soft Green

STITCHES USED
ch: chain
sc: single crochet
dc: double crochet
tr: treble crochet
sl st: slip stitch

DIRECTIONS
With C1, chain 4, join in a ring.

ROUND 1: Ch 4 (counts as first dc and ch1) *dc, ch1* 11 times. Sl st to 3rd ch of starting ch4. Finish off C1. (12 ch1 spaces; 12 dcs)

ROUND 2: Join C2 with slip stitch into any ch1 space. Ch6 (counts as first tr and ch2 space), *tr in next ch1 space, ch2* around. Sl st to 4th chain of ch6. Finish off C2. (12 trs; 12 ch2 spaces)

ROUND 3: Join C3 in any ch2 space. Ch3, (counts as first dc) 2dc, ch1 in same space. *3dc, ch1* in each space around. Sl sl to ch3. Finish off C3. (12 ch1 spaces; 12 ch3 clusters; 36 dcs in total)

ROUND 4: Join C1 with sc in any ch1 space. Ch6, sc in next ch1 space (Corner made.) #*ch3, sc in next ch1 sp* twice. Ch6, sc in next ch1 sp# Repeat between # 3 more times ending with a sl st in starting sc. Finish off C1. (4 ch6 corners; 8 ch3 spaces; 12 sc)

ROUND 5: Join C2 with sl st in a ch6 corner space. Ch3, (counts as first dc) 2dc, ch3, 3dc in corner. Corner made. *ch1, 3dc* in each ch3 space around. When you reach the corner ch6 space, # ch 1, 3dc, ch3, 3dc# Repeat between * 3 more times, and between # when you reach the corner. Ch1 then sl st into 3rd ch of starting ch3. Finish off C2. (4 3dc clusters per side)

ROUND 6: Join C3 in corner space with sl st. Ch3, (counts as first dc) 2dc, ch3, 3dc. Corner made. Dc in each dc and ch1 space around. When you reach the corner *3dc, ch3, 3dc*. Repeat around square. Finish off C3. (21 dcs per side)

ROUND 7: Optional. Join C1 in corner space with sl st. Repeat round 6 substituting sc for dc, or any stitch
necessary to give you a 6 inch square.

~

My awesome, amazing tester craftADDchick tested it, and here is her take:


I love the colors, and how different a darker more wintery palette looks.  She used a Bernat worsted, Red Heart Super Saver, and Lion Brand's Vanna's Choice and left off round 7.

Good luck and happy crocheting!

Wagon Wheel Granny Square


MATERIALS
I - 9 US crochet hook
tapestry needle
stitch markers 

YARN
Any worsted weight yarn in three colors.  For the sample I used:
C1: Lion Brand Pound of Love, in Lavender
C2: Caron Simply Soft, in White
C3: Caron Simply Soft, in Soft Green

STITCHES USED (US TERMINOLOGY)
ch: chain
sc: single crochet
dc: double crochet
tr: treble crochet
sl st: slip stitch

DIRECTIONS

With C1, chain 4, join in a ring.

Round 1:  Ch 4 (counts as first dc and ch 1) *dc, ch 1* 11 times.  Sl st to 3rd ch of starting ch 4.  Finish off C1.  (12 ch 1 spaces; 12 dcs)

Round 2:  Join C2 with sl sl to any ch 1 space.  Ch 6 (counts as first tr and ch 2 space), *tr in next ch 1 space, ch 2* around.  Sl st to 4th ch of ch 6.  Finish off C2.  (12 trs; 12 ch 2 spaces)

Round 3:  Join C3 in any ch 2 space.  Ch 3 (counts as first dc), 2 dc, ch 1 in same space.  *3 dc, ch 1* in each space around.  Sl st to ch 3.  Finish off C3.  (12 ch 1 spaces; 12 ch 3 clusters 36 dcs in total)

Round 4:  Join C1 with sc in any ch 1 space.  Ch 6, sc in next ch 1 space (corner made.) #*ch 3, sc in next ch 1 sp* twice.  Ch 6, sc in next ch 1 sp#  Repeat between # 3 more times ending with a sl st in starting sc.  Finish off C1.  (4 ch 6 corners; 8 ch 3 spaces; 12 sc)

Round 5:  Join C2 with sl st in a ch 6 space.  Ch 3 (counts as first dc) 2 dc, ch 3, 3 dc in corner.  (corner made.)  *ch 1, 3 dc* in each ch 3 space around  When you reach the corner ch 6 space, #ch 1, 3 dc, ch 3, 3 dc#  Repeat between * 3 more times, and between # when you reach the corner.  Ch 1 then sl st into 3rd ch of starting ch 3.  Finish off C2.  (4 3dc clusters per side.)

Round 6:  Join C3 in corner space with sl st.  Ch 3 (counts as first dc), 2 dc, ch 3, 3 dc.  (corner made.)  Dc in each dc and ch 1 space around.  When you reach the corner *3 dc, ch 3, 3 dc*  Repeat around square.  Finish off C3.  (21 dcs per side)

Round 7:  Optional.  Join C1 in corner space with sl st.  Repeat round 6 substituting sc for dc, or any stitch necessary to give you a 6 inch square.


Special thanks to Cindy (craftADDchick) for testing.  For this block she used Bernat Worsted, Red Heart Super Saver, and Lion Brand Vanna's Choice and left off round 7.

~


Pattern copyright Jillian Bankert/OnePinkHippo.  Please do not claim this pattern as your own, or sell or distribute this pattern.  You may sell items made from this pattern.  If you wish to use this pattern, please link to it, but do not reprint it on your site.  Original post. 

Monday, September 14, 2009

Vera's Spike Stitch Daisy Rounds 1 - 9 Tutorial

Some people have been having difficulties with the Vera's Spike Stitch Daisy Square, and jojo99 over on Ravelry posted her tutorial with some changes, so I figured I'd do a tutorial of my own with my directions. Hopefully this will help a ton of folks, and give some people the extra push to try it. It'll also be written in plain English, with no crochet abbreviations, so it does get a bit wordy, but hopefully it'll be clearer.

For this tutorial, I'm using scrap yarn, so the colors are different. I've listed the color changes below, and in the directions. If you want the colors I used in the original, please see the actual pattern post HERE. Thanks. :]

COLORS
Round: original pattern = tutorial
R1: brown = brown
R2: green = purple
R3: yellow = green (Complicated, I know, but I didn't have enough green.)
R4: orange = blue variegated
R5
R6: green = purple
R7: pink = pink variegated
R8
R9: brown = purple

Round 1: With brown, using the adjustable loop/magic ring method, single crochet 12. Join with slip stitch to first single crochet. Fasten off brown. (12 single crochets)

This is what you have:

Round 2: Join purple with slip stitch into any single crochet. Single crochet 12, slip stitch into first single crochet. Fasten off purple. (12 single crochets.)

Now you have:


Round 3: Join green with slip stitch into any single crochet. Chain 3 (counts as first double crochet.), double crochet into same stitch, 2 double crochets in each single crochet around. Fasten off green. (24 double crochets.)

And we have:

Easy peasy lemon squeezy! Now the fun (and the meat of the tutorial) begins.

Round 4: Join blue variegated with a slip stitch to a space between double crochet pair.

The red circle shows where you will be spike stitching into. You will be splitting the two double crochets of round 3 in half; you're working right over them.

*Spike stitch into single crochet in round 2, between each pair of double crochets in round 3, ch 2.* Repeat between * until end. (12 spike stitches and 12 chain 2 spaces).

Here is my almost finished spike stitch, with the slip stitch where I joined. (Here I just joined into a single crochet of round three; it really doesn't matter as much where you join as long as you're spike stitching into the right space.)

Fully completed spike stitch:

This is what round 4 should start to look like after you've done a few spike stitches.

This is what will be on your hook after you've yarn overed, and stuck your hook into the single crochet of round 3. After this, complete the spike stitch like a regular double crochet, yarn over and pull through two loops, yarn over and pull through two remaining loops.

My completed round 4 with all spike stitches:

Round 5: Slip stitch to first chain 2 space. [Chain 3, 2 double crochet] in chain 2 space, slip stitch in top of spike stitch.

Here's my first part:
*3 double crochet in each chain 2 space, slip stitch in top of spike stitch.* Repeat between * until end. Fasten off blue variegated. (12 "petals)

Here I'm showing you the difference in the petals. The red circles are where I have slip stitched to close the petal off; you can see there's more of a definite arc there, versus the yellow circle, where I did a single crochet into the spike stitch.

My finished round 5:

Round 6: Join purple with slip stitch into any slip stitch from round 5.

*double crochet, treble crochet, double crochet, slip stitch* Repeat between * until end. Fasten off purple. (12 "petals")

Here is my first purple petal:

The additional instructions for this round read: Between the * you will be crocheting: a double crochet into the double crochet [of the previous round], a treble crochet into the double crochet, another double crochet into the double crochet, and slip stitching into the slip stitch.

All petals finished. See how it ruffles? That's ok. In the next rounds it'll get even more ruffly, but once you add round 9 to make it into a square it'll flatten out.

Rounds 1 through 6 complete:

Round 7: Join pink with slip stitch in any slip stitch from round 6.
Single crochet in same stitch as joining. *double crochet, treble crochet, double crochet, slip stitch* Repeat between * until end.

3 more completed petals:
Additional instructions for this round read: You will be crocheting a double crochet in the double crochet [of the previous round], a treble crochet in the treble crochet, a double crochet in the double crochet, and slip stitching into the slip stitch.

Round 8: Slip stitch for first single crochet. *double crochet, treble crochet, double crochet, sl st.* Repeat between * until end. Fasten off pink. (12 "petals)

Yes, it should be quite curly at this point.

Round 9: Put a stitch marker in a slip stitch every three petals

See the stitch markers! And there's three petals inbetween them all. Make sure your marker is in a slip stitch between the petals.

Remove one stitch marker and join purple in its space. [Chain 4, treble crochet, chain 2, 2 treble crochet] Then #3 double crochet in next 3 stitches, dc in slip stitch.# Follow between # until you reach marker. Remove marker and *2 treble, chain 2, 2 treble* (Corner made.) Repeat between # until you reach marker, and then between * in marked stitch. Slip stitch to 4th ch of beginning ch 4.

Here is half of round 4. You can see how it's flattened out a little, and where I haven't worked round 9 it's still curly.
Whew, that was a tad tedious. I hope it helps! Let me know if you need anything clarified.

Friday, August 28, 2009

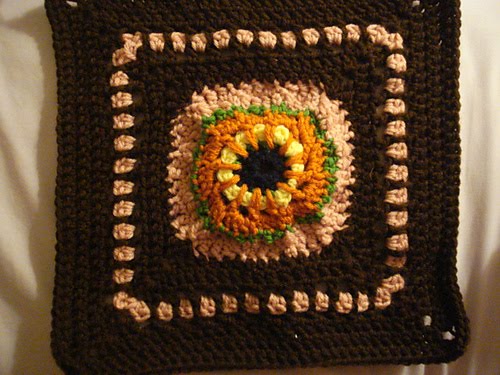
Vera's Spike Stitch Daisy Square


MATERIALS
I - 9 US crochet hook
tapestry needle
stitch markers 

YARN
Small amounts of green, yellow, orange, and pink worsted weight yarn
Brown worsted weight (I used Caron Perfect Match)

STITCHES USED (US TERMINOLOGY)
ch: chain
sc: single crochet
dc: double crochet
tr: treble crochet
sl st: slip stitch
sp st: spike stitch

SPECIAL INSTRUCTIONS
Adjustable loop/magic ring method instructions here and step-by-step photo tutorial here

How to work a double crochet spike stitch:  work a double crochet in the stitch corresponding to the next stitch, but one row below the working row.

DIRECTIONS

With brown, using the adjustable loop/magic ring method, sc 12.  Join with sl st to first sc.  Fasten off brown.  (12 sc)

Round 1:  Join green with sl st into any sc.  Sc 12, sl st into first sc.  Fasten off green.  (12 sc)

Round 2:  Join yellow with sl st into an sc.  Ch 3 (counts as first dc), dc in same stitch, 2 dc in each sc around.  Join with sl st to first ch of ch 3.  Fasten off yellow.  (24 dc)

Round 3:  Join orange with sl st to a space between dc pair.  *sp st into sc in round 2, between each pair of dc in round 3, ch 2*  Repeat between * until end.  (12 sp st; 12 ch 2 spaces)

Round 4:  Sl st to first ch 2 space.  [Ch 3, 2 dc] in ch 2 sp, sl st in top of sp st, *3 dc in each ch 2 sp, sl st in top of sp st*  Repeat between * until end.  Join with sl st to first sl st.  Fasten off orange.  (12 “petals”)

Round 5:  Join green with sl st in any sl st from round 5.  *dc, tr, dc, sl st*  Repeat between * until end  Join with sl st to first sl st.  Fasten off green.  (12 “petals”)  
Additional instructions:  between the * you will be crocheting #dc in the next dc, tr in the next dc, dc in next dc, sl st in next sl st#

Round 6:  Join pink with sl st in any sl st from round 6.  Sc in same stitch as joining.  *Dc tr, dc, sl st*  Repeat between * until end.
Additional instructions:  you will be crocheting #dc in dc (of round 6), tr in tr, dc in dc, sl st in st st#

Round 7:  Sl st to first sc.  *dc, tr, dc, sl st*  Repeat between * until end.  Fasten off pink.  (12 “petals)
Note:  your square will be curly at this point, but it will flatten slightly.

Round 8:  Put a stitch marker in a sl st every 3 petals.  Remove one stitch marker and join brown in its space.  [ch 4, tr, ch 2, 2 tr]  Then #3 dc in next 3 stitches, dc in sl st#.  Follow between # until you reach marker.  Remove marker and *2 tr, ch 2, 2 tr* (corner made.)  Repeat between # until you reach marker, and then between * in marked stitch.  Sl st to 4th chain of beginning ch 4.

Round 9:  Sl st to corner ch 2 space.  [ch 3, dc, ch 2, 2 dc] in corner.  *dc around, then [2 dc, ch 2, 2 dc] in corner.  Repeat between * three times.  (19 total dc per side]

Round 10:  Sl st to ch sp.  [ch 3, dc, ch 2, 2 dc] in corner.  *#[ch 2, skip next dc, dc] 9 times.  ch 2 #[2 dc, ch 2, 2 dc] in corner*  Repeat between * 2 times and between # once.  Join with sl st to top ch of ch 3.  Fasten off brown.

Round 11:  Join pink in any corner space with sl st.  [ch 3, dc, ch 2, 2 dc] in corner.  *2 dc in each ch 2 space, [2 dc, ch 2, 2 dc] in corner.  Repeat between * 3 times.  Fasten off pink.  (24 dc per side)

Round 12:  Join brown in any corner space with sl st.  [ch 2, dc, ch 2, 2 dc] in corner.  ch 1, sp st in 2nd dc of row 11.  *[ch 1, sp st] in next 10 dc of row 11, ch 1 [2 dc, ch 2, 2 dc] in corner*  Repeat between * three times.  (11 spike stitches per side)

Check to see if your square is 12 inches.  I crochet really tightly even with an I hook, so almost always have to add extra rows.  For me, it’s 9 inches at this point; I need to continue 3 more rows.  For all following rows, using brown, [ ch 3, dc, ch 2, 2 dc] *dc across in each dc and ch 1 sp, [2 dc, ch 2, 2 dc]*  Repeat between * three times.  Fasten off when 12 inches is reached.  Weave in ends and add your FO to Ravelry!


Special thanks to Cindy (craftADDchick) for testing.

~

Pattern copyright Jillian Bankert/OnePinkHippo.  Please do not claim this pattern as your own, or sell or distribute this pattern.  You may sell items made from this pattern.  If you wish to use this pattern, please link to it, but do not reprint it on your site.  Original post.

100th post celebration! :: Vera's Spike Stitch Daisy FREE PATTERN

I decided that to celebrate my 100th post, I would post my first! written, completely original pattern, Vera's Spike Stitch Daisy. Enjoy!

Notes:
1. Please read through the pattern first before beginning. Some rounds have additional instructions. If it doesn't make sense as you read it, it'll be easier once you have something in your hands to look at and count.
2. This pattern has only been tested once, and it is my first written pattern. If there is something wrong with the instructions, or you have any suggestions, please let me know: xtechnicolor [at] gmail [dot] com
3. For patterns printed/downloaded before 14 September 2009, please go HERE for errata. The pattern written here has been edited, and is correct.
4. There is also a step-by-step photo tutorial for rounds 1-9 HERE.

All patterns are copyright Jillian Bankert/mochaxlight. Please do not claim this pattern as your own, sell or distribute this pattern, or sell items made from this pattern. If you wish to use this pattern, please link to it, but do not reprint it on your site. And if you make something from one of my patterns, send me a picture or link, because I’d love to see what you make with my patterns: xtechnicolor [at] gmail [dot] com. Thanks.

Special thanks to Craftster user craftADDchick for testing!

Featured as the September block for the Craftster 12" BAM CAL!


VERA'S SPIKE STITCH DAISY 12 INCH SQUARE

MATERIALS

I hook
Small amounts of green, yellow, orange, and pink worsted weight yarn.
Brown worsted weight yarn. (I used Caron Perfect Match.)
Stitch markers

STITCHES AND ABBREVIATIONS

ch: chain
sc: single crochet
dc: double crochet
tc: treble crochet
sl st: slip stitch
sp st: spike stitch

SPECIAL INSTRUCTIONS
Adjustable loop/magic ring method: Instructions here.

How to work a double crochet spike stitch: Work a double crochet in the stitch corresponding to the next stitch, but one row below the working row.

BEGIN TO CROCHET:

ROUND 1: With brown, using the adjustable loop/magic ring method, sc 12. Join with sl st to first sc. Fasten off brown. (12 sc)

ROUND 2: Join green with sl st into any sc. Sc 12, sl st into first sc. Fasten off green. (12 sc)

ROUND 3: Join yellow with sl st into any sc. Ch 3 (counts as first dc), dc in same stitch, 2 dc in each sc around. Join with sl st to first ch of ch 3. Fasten off yellow. (24 dc)

ROUND 4: Join orange with sl st to a space between dc pair. *Sp st into sc in round 2, between each pair of dc in round 3, ch 2* Repeat between * until end. (12 sp st; 12 ch 2 spaces)

ROUND 5: Sl st to first ch 2 space. [Ch 3, 2 dc] in ch 2 sp, sl st in top of sp st, *3 dc in each ch 2 sp, sl sl in top of sp st* Repeat between * until end. Join with sl st to first sl st. Fasten off orange. (12 "petals")

ROUND 6: Join green with sl st in any sl st from round 5. *dc, tr, dc, sl st* Repeat between * until end. Join with sl st to first sl st. Fasten off green. (12 "petals")
Additional instructions: Between the *, you will be crocheting #dc in next dc, tr in next dc, dc in next dc, sl st in next sl st#

ROUND 7: Join pink with sl st in any sl st from round 6. Sc in same stitch as joining. *dc, tr, dc, sl st* Repeat between * until end.
Additional instructions: You will be crocheting #dc in dc (of round 6), tr in tr, dc in dc, sl st in sl st.#

ROUND 8: Sl st to first sc *dc, tr, dc, sl st* Repeat between * until end. Fasten off pink. (12 "petals")
Note: Your square will be curly at this point, but it will flatten slightly.

ROUND 9: Put a stitch marker in a sl st every 3 petals. Remove one stitch marker and join brown in its space. [Ch 4, tr, ch2, 2tr] Then #3 dc in next 3 sts, dc in sl st.# Follow between # until you reach marker. Remove marker and *2tr, ch2, 2tr* (Corner made.) Repeat between # until you reach marker, and then between * in marked stitch. Sl st to 4th ch of beginning ch 4.

ROUND 10: Sl st to corner ch 2 sp, [Ch 3, dc, ch 2, 2 dc] in corner *Dc around, then [2 dc, ch 2, 2 dc] in corner.* Repeat between * three times. (19 total dc per side.)

ROUND 11: Sl st to ch sp, [ch 3, dc, ch 2, 2 dc] in corner. *# [ch 2, skip next dc, dc] 9 times. ch 2 #[2 dc, ch 2, 2 dc] in corner.* Repeat between * two times, and between # once. Join with sl st to top ch of ch 3. Fasten off brown.

ROUND 12: Join pink in any corner space with sl st. [Ch 3, dc, ch 2, 2 dc] in corner. *2 dc in each ch 2 space, [2 dc, ch 2, 2 dc] in corner* Repeat between * 3 times. Fasten off pink. (24 dc per side.)

ROUND 13: Join brown in any corner space with sl st. [Ch 3, dc, ch 2, 2 dc] in corner. Ch 1, sp st in 2nd dc of row 11. *[ch 1, sp st] in next 10 dc of row 11, ch 1 [2 dc, ch 2, 2 dc] in corner* Repeat between * three times. (11 spike stitches per side)

Check to see if your square is 12 inches. I crochet really tightly even with an I hook, so almost always have to add extra rows. For me, it's 9 inches at this point; I need to continue 3 more rows. For all following rows, using brown, [ch 3, dc, ch 2, 2 dc] *dc across in each dc and ch 1 sp, [2 dc, ch 2, 2 dc]* Repeat between * three times. Fasten off when 12 inches is reached. Weave in ends, and send me a picture! :D

Picture courtesy the lovely craftADDchick.

Friday, May 1, 2009

Owl Cross Stitch Pattern

I sketched this up after seeing craftylittlemonkey's adorable 16 hour owl bookmark on Craftster.

click to enlarge. :]